hello again
this is a new page for the detailed about Html, you can get the thing you need to use Html. Hope you will enjoy it!
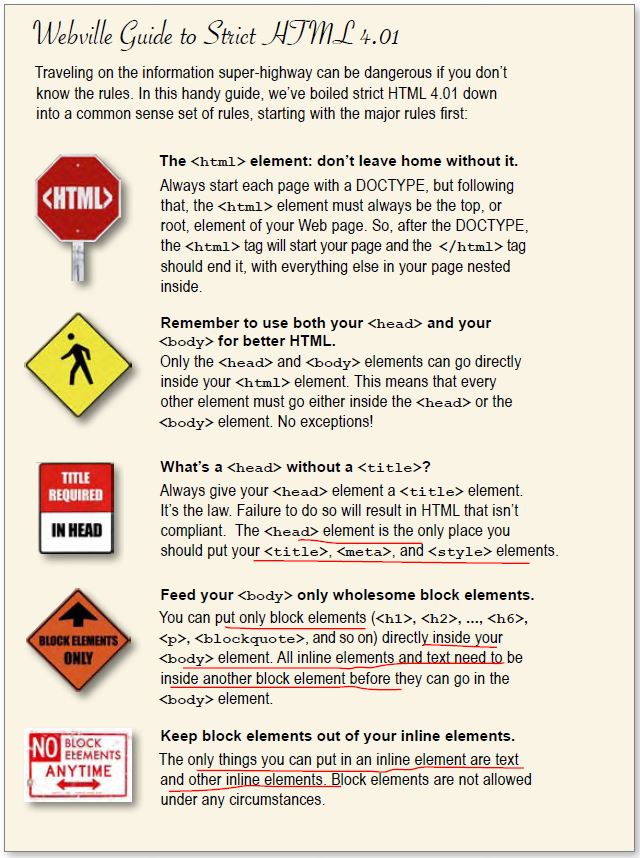
The basic structure of Html is Head and body, of cource do not forget Html
a element can be used to add a link to another web page.
There are some important attributes of < a > element, such as:
title attribute , it can give a tip note about the link page,
id attribute,it can define an anchor,so that you can redirect to the specific location of a web page by adding #id to the href attribute.
if you put img as the content of a element, then the img will also be clickable and will be a link to somethings else.
target attribute, it can make the link page open in a new window, you can name it _blank, or a specific name.
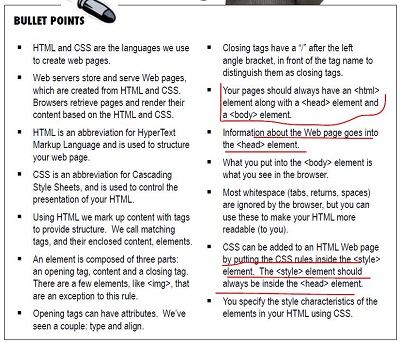
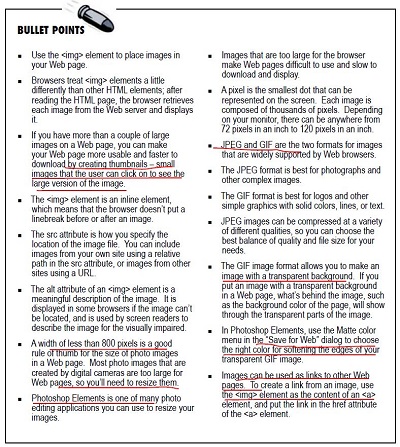
You can find the key points of Chapter1 from the following screenshot of "HeadFirst Html with CSS".
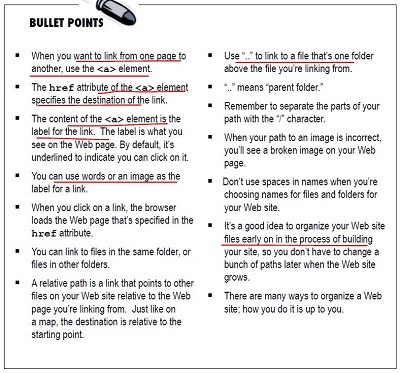
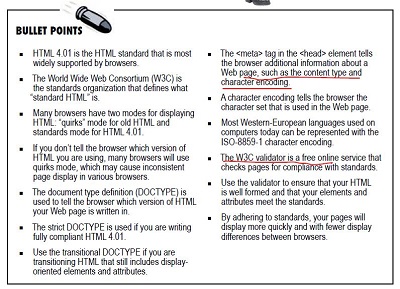
You can find the key points of Chapter2 from the following screenshot of "HeadFirst Html with CSS".
The first thing of a web page is a sketch, just write in picture,
Then from sketch to a outline with basic Html element,
Last, translate from outline to a web page with Html elements.
You can use q element to add a quota, which is text with special style , for example: this is my quote
and here is double quote
q element only used for short quote, and shown inside a paragraph, if you want to have a long quote and want to be shown seperately, then you can use
blockquote element, for example:
hello, my dear, you know that wherever you want to to ,then you will to.
In fact,they are two different kinds of elements: block element and inline element.
br element can help you to begin a new line without using paragraph element.
You can alse use Html to present a list, there are two steps ,as follow:
- Step 1: Put each list item in an li element;
- Step 2: Enclose your list items with either the < ol > stands for ordered list, or ul stands for unordered list
what will you do when you encounter special character, for example < or > or & ? Then you can check for the following link for help:
click here for more
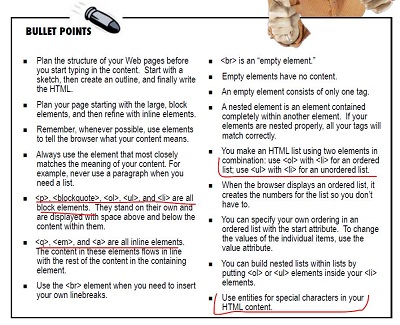
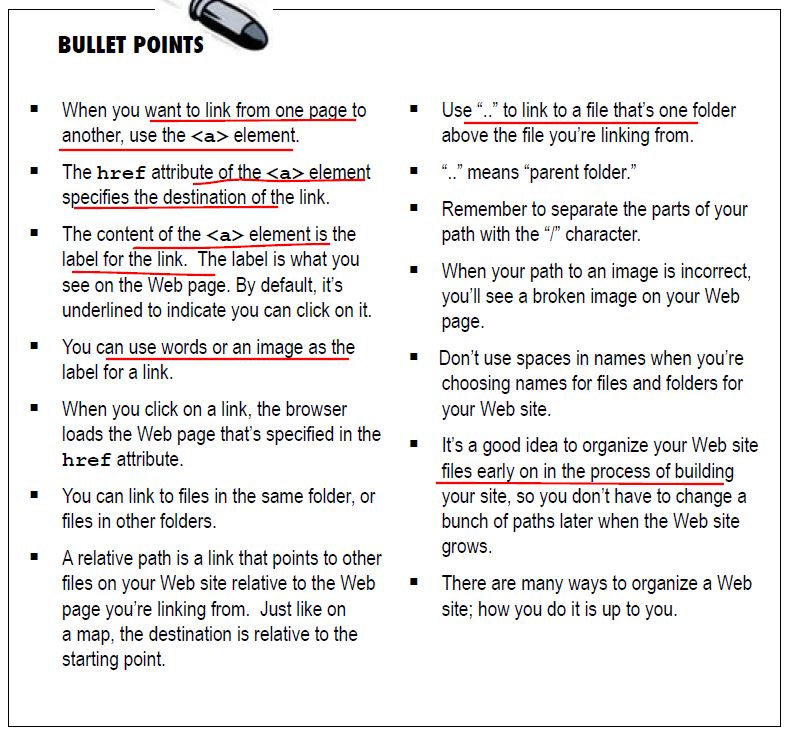
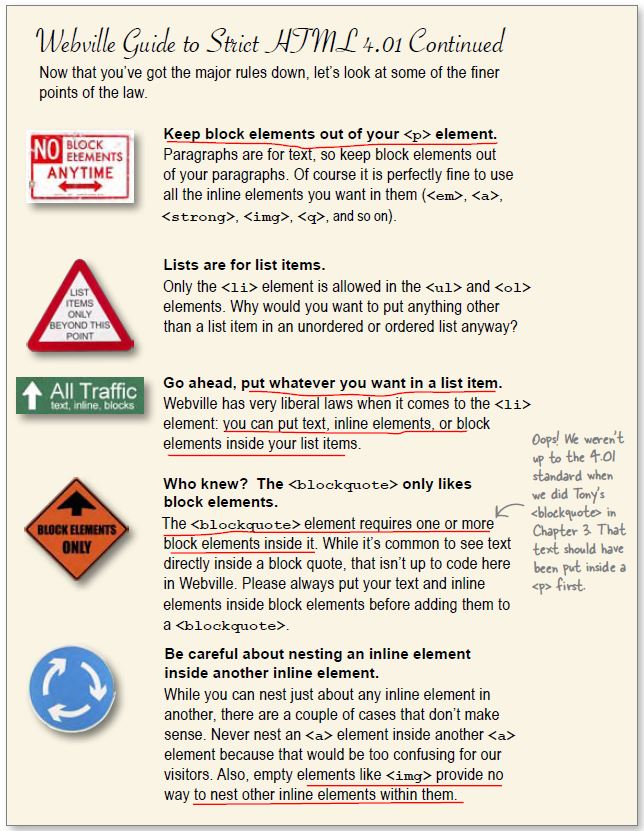
You can find the key points of Chapter3 from the following screenshot of "HeadFirst Html with CSS".
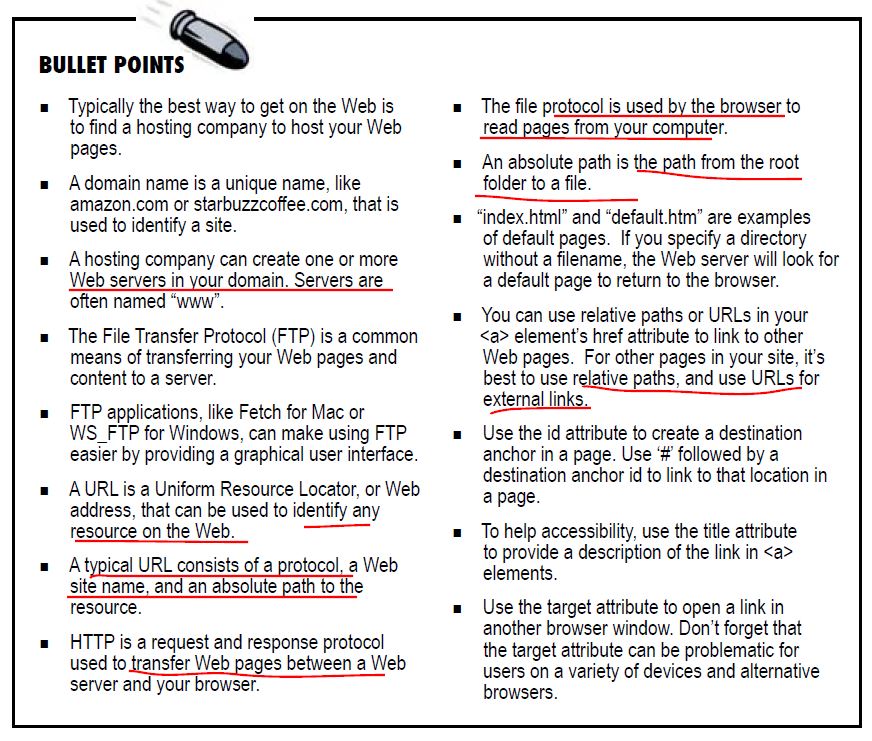
Strictly speaking ,this is not related to Html and CSS, but in order to know how , you would better understand something behind.
The detail information you can refer to the book, here are only some key words help you to summarize:
- Web hosting company: some 24-hour-on-web servers to save your html pages and other files
- Domin name: your own place where you can build anything you like
- FTP: or something else ,the tool you use to move your files from your computer to the web server
- URL: Uniform Resource Location, protocal(usual Http)+ domain name + file location(absoluate path) if you do not indicate the file location ,
then it will direct to the default html page, always index.html or default.htm
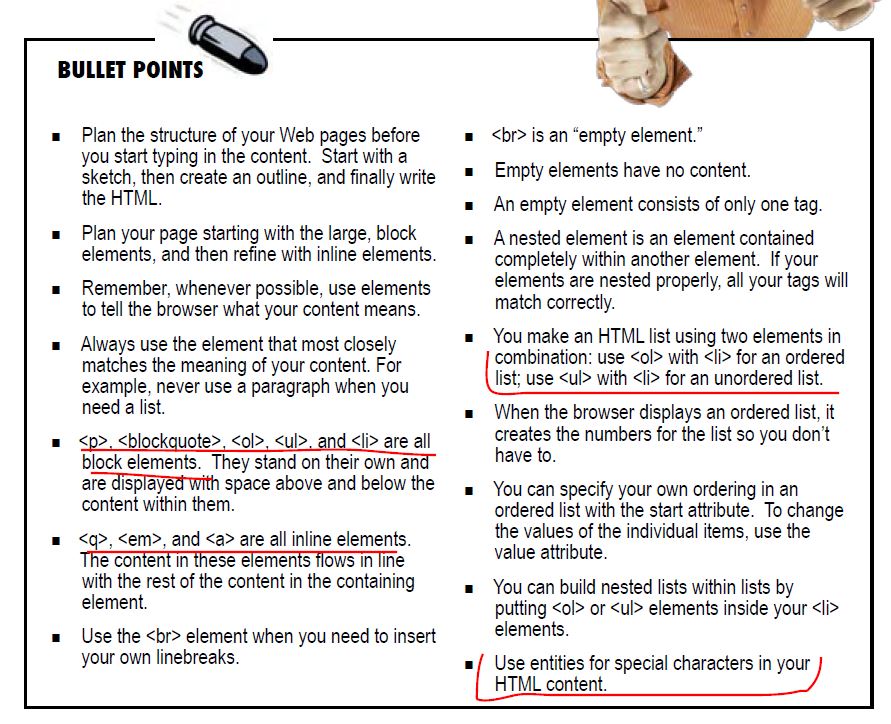
You can find the key points of Chapter4 from the following screenshot of "HeadFirst Html with CSS".
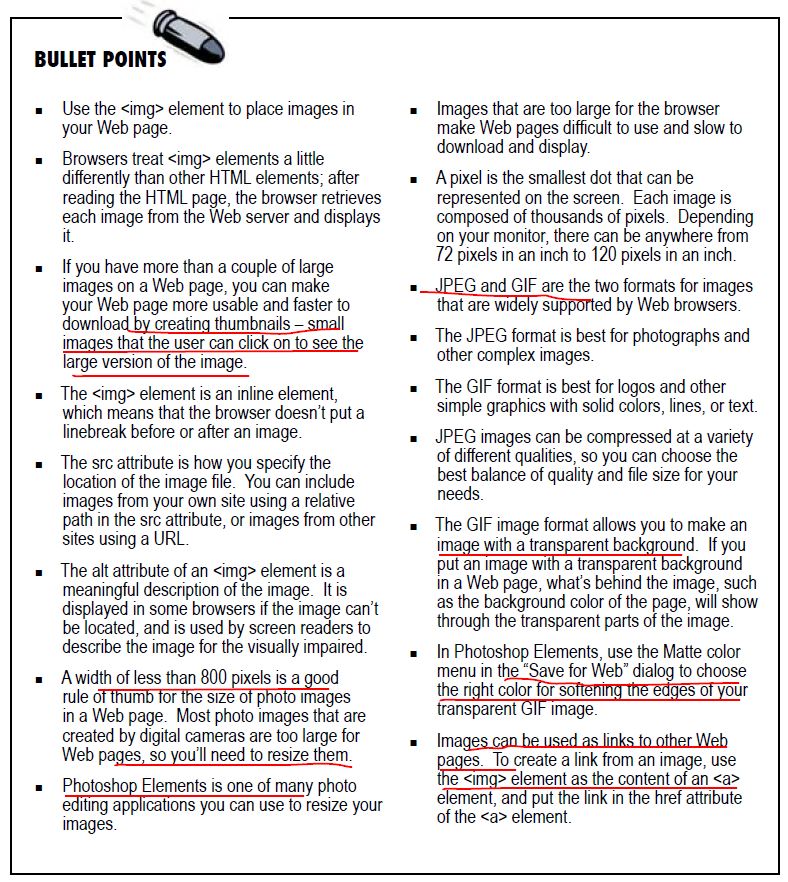
The basic use of img element is simple ,there are some very important attributes of it:
alt attribute can help you give your img a description when the img is not shown successfully
You can use thumbnail to show a big picture and then click the thumbnail to link to the big one , put the <img> inside <a> you can do it.
The resource you can use to check you Html is:click here to validate
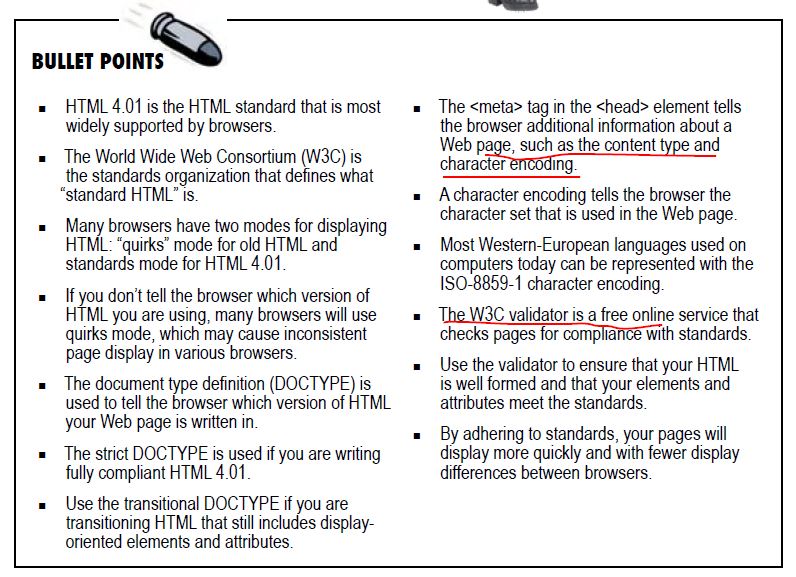
The first thing to do will be to add some basic indicators, for example:
The first line ahead of <html> element would be:

The first line of <head> part would be:

You can refer to the following for some basic HTML rules:
basic rule No. 1
basic rule No.2
The other rules can be seen by the online validation tool.
If your DOCTYPE is strict, then you must follow all the above rules.
XHTML 1.0 is exactly like Html4.0 strict, if your script is already html 4.0 strict,
then there are 3 simple steps to translate from html to XHTML:
- step1: Change your DOCTYPE to XHTML 1.0 Strict;
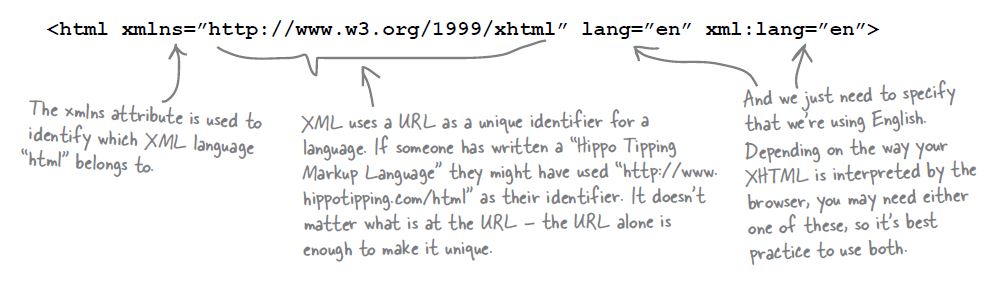
- step2: Add the xmlns, lang , xml:lang attributes to your <html> element;
- step3: All empty tags should end in
"/>"
, not">"
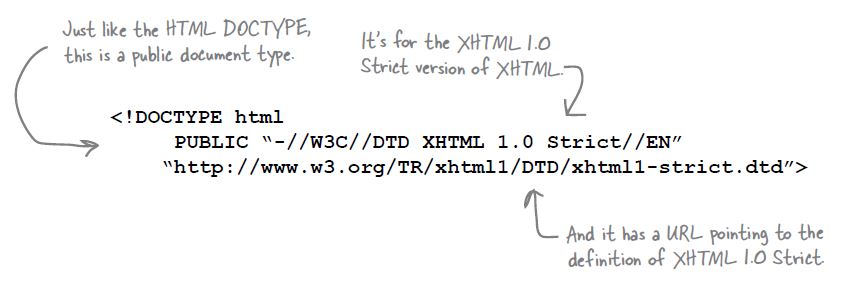
The Doctype of XHTML is:
The html attribute is:
From this chapter on ,you will begin to learn CSS, In this chapter, you will learn how to create CSS file and the basic thing.
you can refer to CSS on line to learn more.
First of all, understand the selectors
You can seperate the CSS into a file .css file and then use link instead of style tag to use the CSS style.
The CSS style has inherit property, and you can use class attribute of each element to set the specific element's style,
it is like atag's id attribute.
Good news is, you can refer to click here to validate your CSS file.
In this chpater, you will expand your CSS vocabulary, means you will have to learn more colorfull usefull CSS style element.
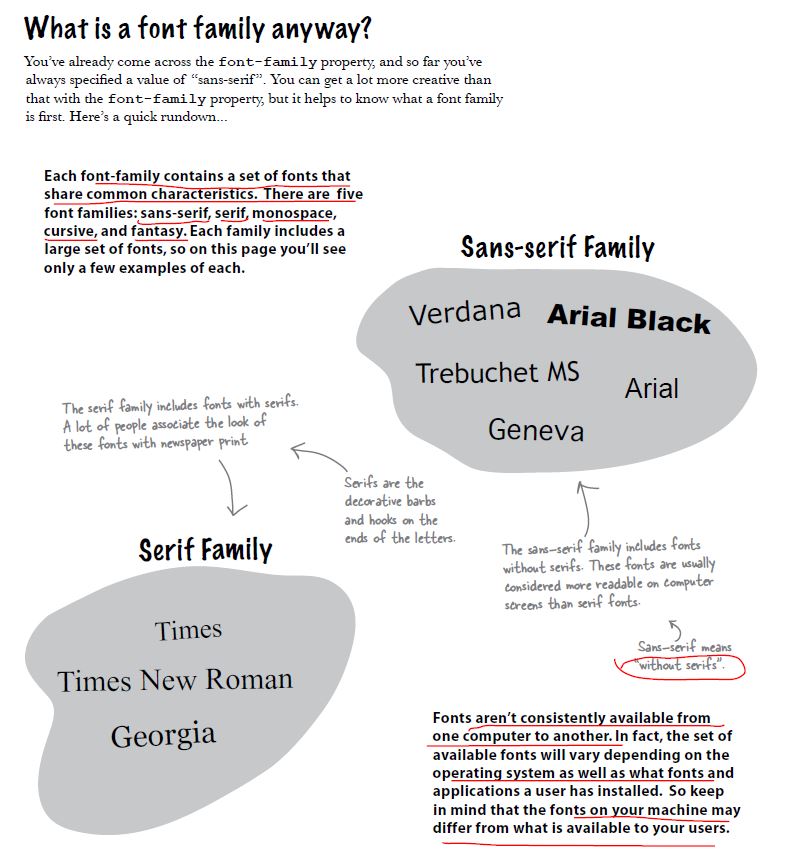
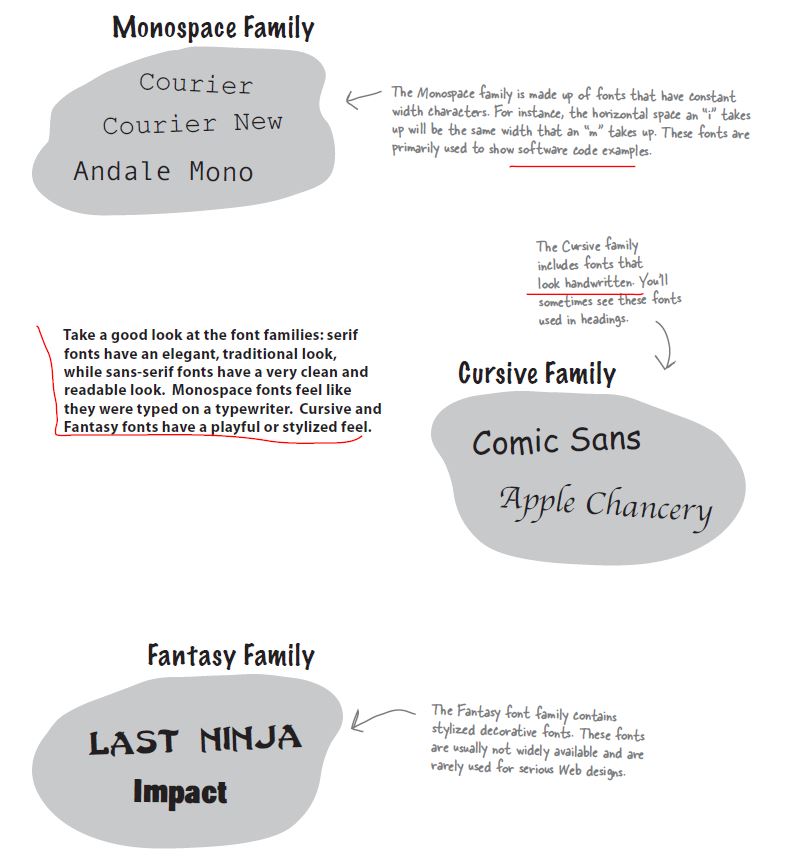
Font: font-family:
There are mainly 5 kinds of font family you can use, In order to make it make, you can write more than one to prepare
in case the font is disabled, the last one must be the generic font family.You can refer to the font family:
click here for font family
click here for font family
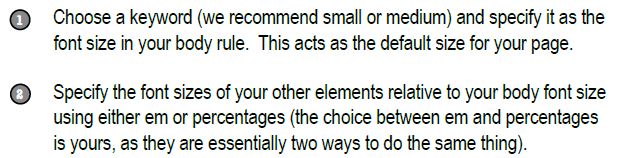
Font size:font-size
There are several ways to set font site,such as pixel, percentage, em(scaling factor),key words(xx-small,x-small,etc)
Be careful with the pixels, some browsers may not support the pixel, the best way to set font size can be refered to the following rule:
Font weight:font-weight
It defines how bold the text looks.The two usually used are: bold, normal.
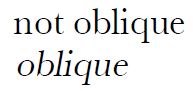
Font style:font-style
The two mostly used font styles and their effect are following, you can choose according to your like.

Color:color
There are 3 kinds to set the color: Name(only 17 names used), relative percentage, and hex code.
text:text-decoration
You can refer to is: underline, overline, line-through, none.
If you want to use more than one decorations, you must combine these in one decoration rule.
Box model: how CSS sees elements,You can refer to the following link to see the box model:
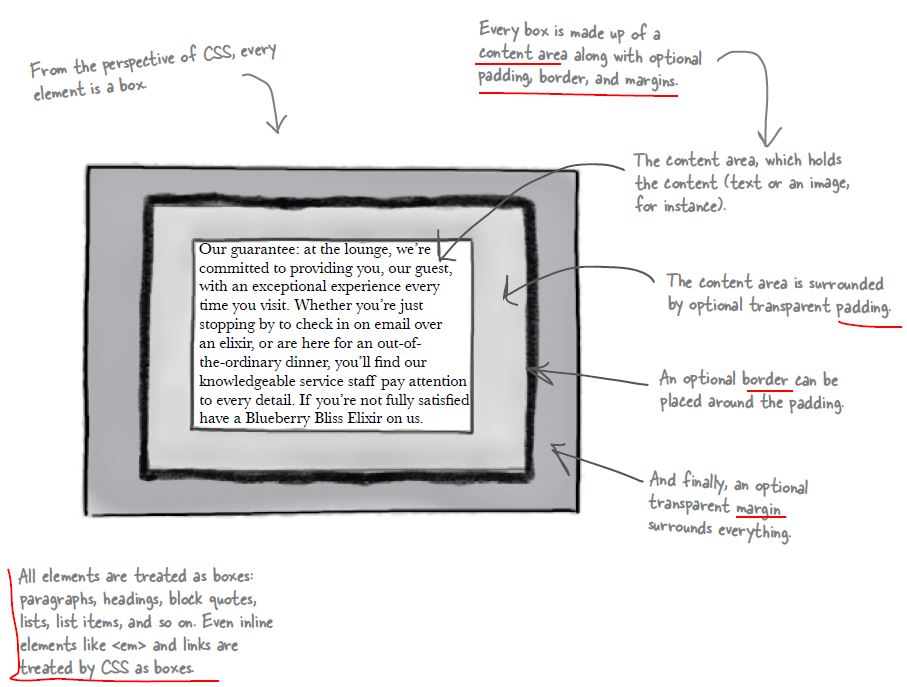
border: border-width, border-style, border-color
padding:
margin:
background-img, background-position, background-repeat
div is used to divid logical section of block element, which are logically related. It is pure structure,it does not have any look or default style.
spanis used to divid logical section of inline elementslogically related,it is also a prur structure, have no default style.
a is a special element, the style changes depending on its state,including visited, unvisited, hover etc.
floatIf you want the page to be seperated into 2 columns, you can use this property. You can do in the following steps:
1.Seperate the content into two divs,2. set the width and float attributes of the part you want to float.
when you set a div to float, it will be romoved from the flow, and other elements will respect the boundary of the float div.
Remeber, you should put the content that you want to float right under the head part. And the width of the fload part does not change.
You can alse set the margin attribute to keep
the two columns distinct.You can useclear property to fix the overlap problem of floating and un-floating part.
liquid & frozen layout:
absolute positioning: when set to absolute position,like float, the part is removed from the flow ,but unlike the float ,the other elements
will not respect the bountry of the absolute div , instead, the other elements ignore it totally.
z-indexprperty: decide who will be on the top
4 position property:
static:
absolute:
fixed:
relative:
The sleleton elements of a table in html are:
table:
th:table heading
tr:table row
td:table data
for cell, there is cell-spacing instead of margin,you can use border-collapse to combine the cell space of two cells.
There are several form elements type you can use.
